# 다운로드 후 실행
wget http://mirror.apache-kr.org//jmeter/binaries/apache-jmeter-3.2.tgz
tar zxvf apache-jmeter-3.2.tgz
apache-jmeter-3.2/bin/jmeter

# 기본 테스트 플랜 설정
test plan (팝업메뉴) -> add -> threads -> thread group 추가
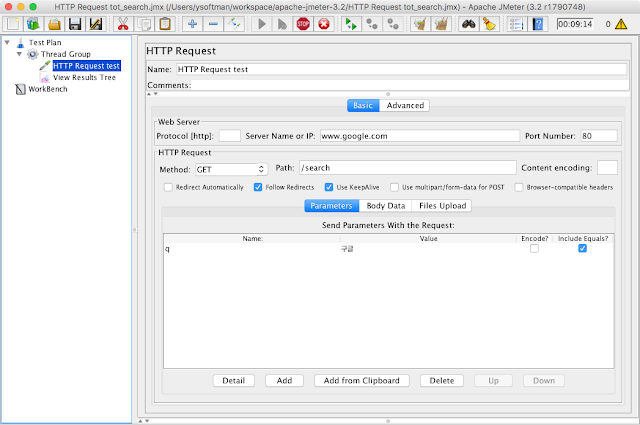
thread group (팝업메뉴) -> add -> sampler -> http request 추가
thread group (팝업메뉴) -> add -> listenser -> view result tree 추가
[thread group]
numbers of threads : 요청에 사용할 쓰레드 개수(사용자 수)
loop count : 요청 회수 명시 또는 무한 요청시 forever 체크
[http request]
name : 이름설정
protocol : 디폴트 http
ip : 요청할 서버 도메인네임 또는 ip
path : 요청 path
parameter : 파라미터를 추가할 경우 key, value 명시
[view results tree]
요청이 시작되면 각 요청마다 결과를 파악할 수 있다.
# 요청 시작
start
# 점진적으로 요청을 늘려가며 테스트
# 플러그인 매니저 jar 파일을 다운받아 lib/ext 에 넣으면 사용할 수 있다.
https://jmeter-plugins.org/wiki/PluginsManager/
# 플러그인 설치
# jmemter option -> pluginsmanager -> available plugins -> 3 basic graph 와 custom thread groups 체크 -> apply changes and restart jmeter
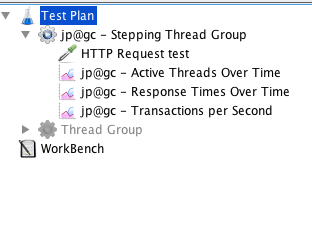
# stepping thread group 추가
test plan -> add -> threads -> stepping thread group
stepping thread group -> add -> listener -> jp@gc 로 시작하는 리스너 모두 추가

# 위와 같이 구성후 start 하면 쓰레드, 응답, tps 등을 각각 리스너로 확인할 수 있다.
# 참고로 맨 처음 만든 Thread group 는 disable
comments:
댓글 쓰기