레이블이 elasticSearch인 게시물을 표시합니다. 모든 게시물 표시

elasticsearch tokenizer

# kibana 에서 로그 조회시 my_log:[ysoftman] 로 질의하면
# [ysoftman] 외 ysoftman 도 조회된다.
# \[ 로 이스케이프해도 동일하다.

# elasticsearch(es) 는 토큰을 생성할때 상황에 맞는 tokenizer(토크나이저)를 선택할 수 있다.
# 디폴트 standard 토크나이저는 공백과 특수문자를 모두 제거한다.
# es 에 다음과 같이 테스트하면 [] @ <> / 는 모두 제거 후 토큰을 분리한다.
# 따라서 ysoftman 처럼 [] 가 없는 토큰이 생성되어 검색시 [] 는 무시된다. 
curl -X GET "http://ysoftman.es.test:9200/_analyze?pretty" -H 'Content-Type: application/json' -d'
{
  "tokenizer" : "standard",
  "text" : "[ysoftman] 123@aac.com this is test... <b>test</b>"
}

# whitespace 토크나이저의 경우 특수문자 제거 없이 공백으로만 토큰을 분리한다.
# 따라서 [ysoftman] 이 자체가 토큰이 된다.
curl -X GET "http://ysoftman.es.test:9200/_analyze?pretty" -H 'Content-Type: application/json' -d'
{
  "tokenizer" : "whitespace",
  "text" : "[ysoftman] 123@aac.com this is test... <b>test</b>"
}

# [] 와 같은 특수 문자까지 구분해서 조회하기 위해서는 whitespace 토크나이저를 사용해야 한다.

# 테스트
# whitespace 토크나이저를 사용하는 ysoftman-test-001 인덱스 생성
curl -X PUT "http://ysoftman.es.test:9200/ysoftman-test-001" -H 'Content-Type: application/json' -d'
{
  "settings": {
    "analysis": {
      "analyzer": {
        "ysoftman_tokenizer": { 
          "tokenizer": "whitespace"
        }
      }
    }
  },
  "mappings": {
      "properties": {
      "my_log": {
          "type": "text",
          "analyzer": "ysoftman_tokenizer"
      }
    }
  }
}
'
# 인덱스 생성 확인
curl "http://ysoftman.es.test:9200/ysoftman-test*"

# 설정한 토크나이저가 동작하는지 확인해 보자.
# explain = true 로 설정하면 사용된 토크나이저 정보가 응답에 추가된다.
curl -X GET "http://ysoftman.es.test:9200/ysoftman-test-001/_analyze?pretty" -H 'Content-Type: application/json' -d'
{
  "explain": true,
  "field": "my_log",
  "text" : "[ysoftman] lemon @apple @juice, 12 - 999"
}'

# 이제 ysoftman 와 [ysoftman] 데이터를 추가한다.
curl -X POST "http://ysoftman.es.test:9200/ysoftman-test-001/_doc/1" -H 'Content-Type: application/json' -d'
{
  "my_log" : "[ysoftman] lemon @juice, 100"
}
'
curl -X POST "http://ysoftman.es.test:9200/ysoftman-test-001/_doc/2" -H 'Content-Type: application/json' -d'
{
  "my_log" : "ysoftman apple @juice, 200"
}
'

# 이제 [ysoftman] 만 조회된다.
curl -X GET "http://ysoftman.es.test:9200/_search?pretty" -H 'Content-Type: application/json' -d'
{
  "query": {
    "match": {
      "text": "[ysoftman]"
    }
  }
}
'

# kibana -> index pattern -> ysoftman-test* 인덱스 생성
# *ysoftman* 로 조회시 [ysoftman] , ysoftman 모두 조회
# [ysoftman] 로 조회시 [ysoftman] 만 조회
# ysoftman 로 조회시 ysoftman 만 조회

# 결론
# 특수문자까지 구분하는 exact matching 을 할경우 whitespace 를 사용하면 되지만
# 한글자만 틀려도 조회되지 않아 필요시에만 사용하는게 좋다.

# 테스트 종료 후 인덱스 삭제
curl -X DELETE "http://ysoftman.es.test:9200/ysoftman-test-001"

# 참고
httpd content-encoding 헤더 누락 문제

# nginx proxy -> apache httpd 웹서버 구성에서
# apache httpd 2.4 버전업과 brotli(br) 압축을 적용했다.
# 다음과 같이 nginx 에 br 인코딩 헤더로 요청을 준다.
# 참고로 -I 로 헤더만 보는경우 curl 은 HEAD method 로 요청하기 때문에
# 실제 GET 요청에서 응답받는 헤더를 보려면 GET method 로 지정해야 한다.
curl 'http://ysoftman-nginx/test?param=ysoftman'-H 'accept-encoding:br' -I -X GET

# 다음과 같이 content-encoding: br 응답헤더를 볼 수 있다.
HTTP/2 200
date: Thu, 03 Oct 2019 13:13:34 GMT
content-type: text/html; charset=utf-8
vary: Accept-Encoding
content-encoding: br
server: ysoftman-nginx
cache-control: private, no-cache, max-age=0
expires: -1

# gzip 요청도 테스트 해보면
curl 'http://ysoftman-nginx/test?param=ysoftman'-H 'accept-encoding:gzip' -I -X GET

# 다음과 같이 content-encoding: gzip 응답헤더를 볼 수 있다.
HTTP/2 200
date: Thu, 03 Oct 2019 13:09:34 GMT
content-type: text/html; charset=utf-8
vary: Accept-Encoding
content-encoding: gzip
server: ysoftman-nginx
cache-control: private, no-cache, max-age=0
expires: -1

# 문제
# nginx 에서 packetbeat 을 설치해 httpd 의 응답 헤더를 수집해 elasticsearch(es) 보냈다.
# kibana 로 content-encoding 헤더가 br 또는 gzip 을 카운트 하려는데
# http.response.headers.content-encoding 헤더 자체가 없는 로그가 있다.
# "accept-encoding" 요청이 없으면 plain text 로 헤더가 없는게 맞지만
# "accept-encoding: gzip" 요청은 있어야 한다.
# http.response.headers.content-encoding: br 은 잘 남고 있었다.
# 원인
# curl 이나 실제 브라우저에서 테스트 해보면
# content-encoding: br 또는 gzip 응답이 확인된다.
# 하지만 nginx 가 아닌 httpd 로 요청하면
# gzip 요청에 대해선 content-encoding 응답헤더가 없었다.
curl 'http://ysoftman-httpd/test?param=ysoftman'-H 'accept-encoding:gzip' -I -X GET

# gzip 처리를 nginx 가 해줘 nginx 의 packetbeat 은
# httpd 로 부터의 응답에서 "content-encoding: gzip" 찾을 수 없었던 것이다.
# 찾아보니 httpd.conf 에서 응답 필터 처리시
# 다음과 같이 brotli 만 응답 필터링한게 문제였다.
SetOutputFilter BROTLI_COMPRESS

# 해결
# SetOutputFilter 는 주석처리하고
# 다음과 같이 AddOutputFilterByType 로
# deflate(gizp에서 사용하는 무손실 압축 알고리즘), brotli 둘다 사용할 수 있게 했다.
# 먼저 추가한 필터가 우선순위를 가져 br 먼저 설정해야 한다.
AddOutputFilterByType BROTLI_COMPRESS text/html text/plain text/xml text/css text/javascript application/x-javascript application/javascript application/json application/x-font-ttf application/vnd.ms-fontobject image/x-icon

AddOutputFilterByType DEFLATE text/html text/plain text/xml text/css text/javascript application/x-javascript application/javascript application/json application/x-font-ttf application/vnd.ms-fontobject image/x-icon

# 그리고 AddOutputFilterByType 사용하려면 filter 모듈을 추가해야 한다.
LoadModule filter_module modules/mod_filter.so

# 이제 httpd 요청시에도 "content-encoding: gzip" 헤더를 받을 수 있고,
# packetbeat 에서도 잘 수집돼 -> es -> kibana 로 content-encoding 값을 구분 할 수 있다.

# 참고
https://httpd.apache.org/docs/current/mod/mod_filter.html#AddOutputFilterByType
https://www.tunetheweb.com/performance/brotli/

kibana urlencoding string field 이슈

# 다음과 같은 es 환경을 사용중이다.
nginx packetbeat -> es -> kibana

# nginx로 들어오는 요청을 카운트하는 visualize (그래프)를 생성할때
http.request.params

# 로 스트링 형태의 파라미터 필드값을 사용하는데,
# 여기에 한글과 같은 non-ascii 의 경우 URL encoding 된 상태다.
# 문제는 막대그래프로 보면 레이블이 %x 와 같이 URL 인코딩된 상태로 보인다는 것이다.
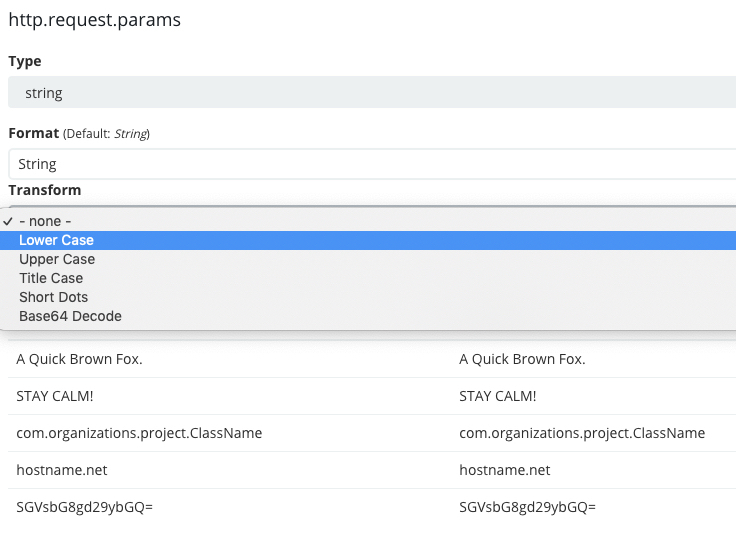
# 필드값을 커스터마이징 하려고
kibana -> index patterns -> 아무 string 필드 -> type format -> string

# 에서 transform 을 보면 아래 사진과 같이 URL 인코딩 요소는 없다.


# 이런 이슈를 제기한 사람이 있었지만 아쉽게도 kibana 에선 공식 지원이 없다고 한다
https://discuss.elastic.co/t/how-to-use-url-decode-on-json-input/106626

# kibana plugin 를 만들던가 아니면 kibana 소스를 수정(contribute?)해야 한다.


#####


# kibana 소스 수정해서 실행하기
# 참고
https://github.com/creationix/nvm
https://github.com/elastic/kibana/blob/master/CONTRIBUTING.md

# 우선 ~/.nvm 디렉토리 생성후 nvm 설치해야 한다.
mkdir ~/.nvm
export NVM_DIR=~/.nvm
curl -o- https://raw.githubusercontent.com/creationix/nvm/v0.33.11/install.sh | bash

# kibana 를 내 github 으로 fork 한다.
# fork 된 kibana 소스 다운로드
git clone https://github.com/ysoftman/kibana.git kibana
cd kibana

# 커밋시 사용할 사용자 정보 설정
git config user.email "ysoftman@gmail.com"
git config user.name "ysoftman"

# kibana 원저장소 upstream 으로 설정
git remote add upstream "https://github.com/elastic/kibana"

# upstream 최신 내용 가져오기
git fetch upstream

# master 내용 urldecode-transform 로 반영해서 충돌있으면 수정
git merge upstream/master

# 8.11.4 버전의 노드 사용(kibana 버전에 따라 달라질 수 있다)
nvm install 8.11.4 && nvm use 8.11.4
# kibana 8 의 경우
nvm install 10.15.2 && nvm use 10.15.2
# 10.15.2 를 디폴트로 설정(매번 nvm use 를 하지 않으려면)
nvm alias default 10.15.2

# nvm 버전 확인
nvm list

# kbn(kibana) bootstrap(kibana 실행에 필요한 의존성 패키지들 설치)
# kibana 업데이트로 소스 변경이 발생할때마다 설치해줘야 한다.
yarn kbn bootstrap

# 만약 ubuntu 에서 다음 에러 발생한다면
ERROR: [Errno 2] No such file or directory: 'kbn'

# yarn 최신 버전 설치한다.
# 참고 https://yarnpkg.com/en/docs/install#debian-stable
curl -sS https://dl.yarnpkg.com/debian/pubkey.gpg | sudo apt-key add -
echo "deb https://dl.yarnpkg.com/debian/ stable main" | sudo tee /etc/apt/sources.list.d/yarn.list
sudo apt-get update && sudo apt-get install yarn

# es(elasticsearch) 스냅샷(nightly 버전 다운받아 실행 한다.)
yarn es snapshot

# es 스냅샷은 최신버전만 제공하기 때문에 kibana 가 최신 업데이트 되지 않으면
# 예전 버전의 스냅샷 찾기 때문에 다음 에러가 발생한다.
Error: Unable to download elasticsearch snapshot: Not Found

# 만약 오랜 버전의 es 를 사용하려면 .tar 파일을 다운받아 archive 로 실행한다.
# 이 방법은 es 와 kibana 호환을 위해서 되도록이면 snapshot 을 사용하자.
wget https://artifacts.elastic.co/downloads/elasticsearch/elasticsearch-7.3.0-linux-x86_64.tar.gz
yarn es archive ./elasticsearch-7.3.0-linux-x86_64.tar.gz

# (es가 실행중이기 때문에 별도의 쉘에서) kibana 실행
yarn install && yarn start

# kibana 접속
# url path 는 매번 시작시 랜덤하게 정해진다.
http://localhost:5603/kur

# kibana 디폴트 로그인
id : elastic
pw : changeme

# kibana 빌드
yarn build

# urldecode-transform 브랜치에서 수정 작업하기
git checkout -t origin/urldecode-transform


#####

# string 필드의 transform -> URL decode 추가 커밋 참고
https://github.com/elastic/kibana/pull/25694/commits/9b715d68d862bd095263188c3314416441ff0ef0

# 이제 kibana 웹페이지를 refresh 한다.
# kibana -> index patterns -> 수정할 스트링 필드 -> type format -> string 에 다음 그림처럼 url decode 항목이 적용된다.


# mocha 로 수정부분만 테스트
yarn test:mocha "src/**/field_formats/types/__tests__/**/string.js"

# pr 하면 kibana jenkins 에서 jest 를 수행하기 때문에
# jest snap 수정후
src/legacy/ui/public/field_editor/components/field_format_editor/editors/string/__snapshots__/string.test.js.snap

# jest 테스트가 필요하다.
yarn test:jest

# 최초 upstream 푸시
git push -u upstream

# github PR 요청
# kibana 7.5 버전에 포함될 예정이다~ㅋ
https://github.com/elastic/kibana/pull/25694

# 수정 커밋이 있을 경우
# ysoftman/kibana 의 urldecode-transform 브랜치로 push 하면 된다.

# 참고로 수정내용 배포는 yarn 빌드를 해야 하지만 yarn 빌드에 문제가 있는 경우
# 간단하게(사실 번들링 소스는 포맷팅도 안되고 파일 사이즈가 크다)
# kibana release .tar.gz 소스를 다운받아 압축을 해제 후
# kibana.bundle.js 에서 위 수정사항을 추가한다.
# 그리고 다음처럼 압축한다.
tar czf kibana-5.4.1-linux-x86_64-modified.tar.gz

LogStash 사용하기

LogStash 는 Java 기반의 오픈소소 툴로 구조화되지 않은 일반 로그 데이터를 특정 필터로 가공하여 ElasticSearch 와 같은 검색 시스템에 전송해주는 일종의 로그 수집기다.
input - filter - output 의 파이프 라인 구조로 플러그인을 통해 다양한 데이터 가공 및 입출력이 가능하다.

# 설치
# Java(JDK or JRE) 설치가 되어 있어야 한다.
# 다운로드 후 압축 풀기
# https://www.elastic.co/downloads/logstash

# 윈도우 기준 설명
# 설정을 커맨드에 명시하여 실행하는 경우
# 표준 입력으로 데이터를 입력 받아 필터없이 표준 출력으로 데이터를 출력하는 설정
bin\logstash.bat -e 'input { stdin {} } output { stdout {} }'

# 설정 파일 만들기
vim logstash.conf
input {
# 파일 내용이 변경되는 경우
# file 의 필드 별 설정(@version 및 @timestamp 필드는 기본 적용)
file {
# type 필드 => 정해진 값은 없고 정해서 사용하면 됨
type => "textlog"

# tag 필드 => 태그를 달 수 있다.
tags => ["tag1", "tag2", "tag3"]

# 커스텀 필드를 추가 할 수 있다.
# hash(key=>value 형태)
add_field => {
"name" => "mypc"
"ip" => "127.0.0.1"
}

# path 필드 => 로그 파일이 있는 절대 경로 명시
path => "C:/ysoftman/*.log"

# 파일 처음부터 변경 부분 검색(디폴트 end)
start_position => "beginning"

# 파일 상태 체크 주기 설정 (디폴트1초)
stat_interval => 1

# 1시간으로 이전 수정된 파일은 수집에서 제외 (디폴트 86400 (하루))
ignore_older => 3600

# 인코딩 명시(기본 UTF-8 로 취급)
codec => plain {
charset => "EUC-KR"
}
}
}

filter {
grok {
# 메시지 필드에 test 나 testing 스트링이 있다면
match => { "message" => ["test" , "testing"] }

# 위 조건이 참이면 ysoftman 태그 추가
# 위 조건에 맞지 않으면 _grokparsefailure 태그가 자동으로 추가된다.
add_tag => [ "ysoftman" ]
}

# _grokparsefailure 태그가 있다면 drop (output 으로 전달되지 않는다.)
#if "_grokparsefailure" in [tags] {
# drop {}
#}

# _grokparsefailure 태그만 지우기
mutate {
remove_tag => ["_grokparsefailure"]
}
}

output {
# elasticsearch 서버의 주소 명시
elasticsearch {
# 해당 호스트로 전송
hosts => ["localhost:9200"]
}
# 디버깅을 위해 표준 출력 표시
stdout {
# rubydebug 형식의 보기 좋은 json 포맷으로 표시
codec => rubydebug
}
}


# 설정 파일 사용하여 실행하는 경우
bin\logstash.bat agent -f logstash.conf

# 이제 지정 경로의 파일에 변화가 있다면 변경된 내용이 elasticsearch 전송되고, 콘솔에 다음과 같이 출력된다.
{
       "message" => "ysoftman test message...\r",
      "@version" => "1",
    "@timestamp" => "2016-06-01T07:32:46.249Z",
          "path" => "C:/ysoftman/ysoftman.log",
          "host" => "ysoftman",
          "type" => "textlog",
        "name" => "mypc",
              "ip" => "127.0.0.1",
          "tags" => [
        [0] "tag1",
        [1] "tag2",
        [2] "tag3",
        [3] "ysoftman"
    ]
}

# ElasticSearch(Kibana) 를 통해 추가된 로그 확인해보기
http://localhost:5601

# 플러그인 관련
# 설치된 플러그인 버전정보 보기
bin\plugin.bat list --verbose

# 설치된 플러그인 모두 업데이트(잘못되면 logstash 다시 설치해야함)
bin\plugin.bat update

# 예) file 플러그인 설치하기
bin\plugin.bat install logstash-input-file

참고
https://www.elastic.co/guide/en/logstash/current/config-examples.html
https://www.elastic.co/guide/en/logstash/current/plugins-inputs-file.html
https://www.elastic.co/guide/en/logstash/current/plugins-filters-grok.html#plugins-filters-grok-match
https://www.elastic.co/guide/en/logstash/current/plugins-filters-drop.html
https://www.elastic.co/guide/en/logstash/current/plugins-filters-mutate.html

ElasticSearch 과 Kibana 사용하기

ElasticSearch 는 Java 로 만든 Apache Lucene(루씬)을 기반으로한 분산 검색엔진이다.
데이터를 JSON 형식으로 저장하여 스키마 프리하며 확장이 용이하며 검색 기능이 꽤 강력하여 여러곳에서 사용되고 있다.
Kibana 는 ElasticSearch 를 쉽게 사용할 수 있도록 도와주는 일종의 시각화 도구이다.

##########

# ElasticSearch 설치
# 기본적으로 Java 로 만든 루씬을 사용하기 때문에 Java 실행 환경이 우선되어야 한다.
# JAVA_HOME 환경 변수가 등록되어 있는지 확인하고 없으면 JDK 를 설치하자.
# https://www.elastic.co/downloads/elasticsearch  다운로드 후 압축만 풀어 사용하면 된다.
# Elastic 시리즈의 다른 제품도 많은데 ElasticSearch 와 연동하기 쉽다.
# windows에서는 elasticsearch-2.3.3.zip 기준
# 커맨드라인으로 서버 실행하기
bin\elasticsearch.bat
# 커맨드라인으로 실행하면 다음과 같이 자바 프로세스가 수행된다.
"c:\Program Files\Java\jdk1.7.0_21\bin\java"   -Xms256m -Xmx1g -Djava.awt.headless=true -XX:+UseCMSInitiatingOccupancyOnly -XX:+HeapDumpOnOutOfMemoryError -XX:+DisableExplicitGC -Dfile.encoding=UTF-8 -Djna.nosys=true  -Delasticsearch -Des-foreground=yes -Des.path.home="C:\elasticsearch-2.3.3" -cp "C:\elasticsearch-2.3.3/lib/elasticsearch-2.3.3.jar;C:\elasticsearch-2.3.3/ㅁlib/*" "org.elasticsearch.bootstrap.Elasticsearch" start
# 윈도우 서비스로 등록하기(삭제는 remove 옵션)
bin\service.bat install
# 서비스로 서버를 시작하면 다음과 같은 프로세스가 수행된다.
elasticsearch-service-x64.exe

# osx 에서는
brew install elasticsearch
brew services start elasticsearch

# centos 에서는(5.2.2 기준, java 필요시 yum install java)
curl -O "https://artifacts.elastic.co/downloads/elasticsearch/elasticsearch-5.2.2.tar.gz"
tar zxvf elasticsearch-5.2.2.tar.gz
# restart
cat elasticsearch.pid | xargs kill
./elasticsearch-5.2.2/bin/elasticsearch -d -p elasticsearch.pid

# 설정 파일 수정
vi config\elasticsearch.yml
# osx 에서는 (brew info elasticsearch 로 config 경로 확인)
vi /usr/local/etc/elasticsearch/elasticsearch.yml
cluster.name: ysoftman-cluster1
network.host: 10.10.10.10
http.port: 9200

# 서버 확인
# 다음과 같이 접속해보면 json 형식으로 클러스터명과 버전을 확인할 수 있다.
http://10.10.10.10:9200/

# 플러그인 설치(centos 에서는 bin/elasticsearch-plugin 사용)
plugin.bat install --verbose analysis-icu
# elasticsearch 2.3.3 버전에서 아래 플러그인이 지원되지 않아 skip
#plugin.bat install --verbose Aconex/elasticsearch-head
#plugin.bat install --verbose lukas-vlcek/bigdesk

# 설치된 플러그인 리스트
plugin.bat list

##########

# Kibana 설치
# windows 에서는
https://www.elastic.co/downloads/kibana 다운로드 후 압축풀어 사용한다.

# 설정 파일
vi config/kibana.yml
# osx 에서는 (brew info kibana 로 config 경로 확인)
vi /usr/local/etc/kibana/kibana.yml
server.port: 5601
server.host: "10.10.10.11"
elasticsearch.url: "http://10.10.10.10:9200"

# 시작(ElasticSearch 디폴트 10.10.10.10:9200 로 연결)
bin\kibana.bat

# osx 에서는
brew install kibana
brew services start kibana

# centos 에서는(5.2.2 기준)
curl -O "https://artifacts.elastic.co/downloads/kibana/kibana-5.2.2-linux-x86_64.tar.gz"
tar zxvf kibana-5.2.2-linux-x86_64.tar.gz

# 혹시 열려 있는 kibana 프로세스 확인
ps -ef | grep '.*node/bin/node.*src/cli'

# restart(daemon 설치 포스트 참고)
daemon --name=kibana --pidfile="/home/ysoftman/kibana.pid" --stop
daemon --name=kibana --pidfile="/home/ysoftman/kibana.pid" --chdir="/home/ysoftman" --  "./kibana-5.2.2-linux-x86_64/bin/kibana"

# kibana 확인
http://10.10.10.11:5601/

# 추후 logstash 로 유입된 로그 데이터를 검색(Discover->검색명령)할 수 있다.
# elasticsearch 는
# DSL(Domain Specific Language)의 json 형태의 쿼리로 검색할 수 있고
https://www.elastic.co/guide/en/elasticsearch/reference/current/query-dsl.html

# lucene 쿼리로도 검색할 수 있다.
https://www.elastic.co/guide/en/kibana/current/lucene-query.html

# 예제
# AND, OR, NOT 은 대문자로 써야하고 각각은 && || ! 로 쓸 수 있다.
# http.response.code 필드가 존재하고, 값은 200,204,302가 아닌것들 검색
(_exists_:http.response.code) AND NOT(http.response.code:200) AND NOT(http.response.code:204) AND NOT(http.response.code:302)

##########

# 테스트 해보기
# curl 바이러리 다운로드(윈도우 기준)
https://bintray.com/artifact/download/vszakats/generic/curl-7.49.0-win32-mingw.7z

# 환경변수 추가(윈도우 기준)
PATH=%PATH%;C:\curl-7.49.0-win32-mingw\bin

# 문서 추가(생성)
# 리눅스는 옵션값에 quote(')를 사용하지만 윈도우는 doublequote(")를 사용해야 한다.
curl -X PUT http://10.10.10.10:9200/2016-05-27/ysoftman/doc1 -d "
{
"no\":123456,
"name\":\"ysoftman\",
"etc\":\"melong\"
}
"

# 문서 조회(curl 대신 브라우저 URL 로 요청해도 된다.)
curl -X GET http://10.10.10.10:9200/2016-05-27/ysoftman/doc1

# 문서 검색(curl 대신 브라우저 URL 로 요청해도 된다.)
curl -X GET http://10.10.10.10:9200/2016-05-27/ysoftman/_search?q=name:ysoftman

# 문서 삭제
curl -X DELETE http://10.10.10.10:9200/2016-05-27/ysoftman/doc1

# 참고
https://www.elastic.co/downloads/elasticsearch
https://www.elastic.co/guide/en/elasticsearch/plugins/2.3/plugin-management.html
https://www.elastic.co/guide/en/elasticsearch/reference/current/docs-index_.html
https://curl.haxx.se/docs/httpscripting.html#Modify_method_and_headers
http://d2.naver.com/helloworld/273788

JSON document DB

JSON document 를 저장하고 싶은데 CouchDB, Elasticsearch, MongoDB 어떤것을 선택해야 할까?
https://db-engines.com/en/system/CouchDB%3BElasticsearch%3BMongoDB